Email deliverability is a common issue for WordPress site owners. If your emails are landing in spam or not getting delivered at all, it’s often because they lack proper authentication. One of the best ways to fix this is by adding a DKIM (Domain Keys Identified Mail) signature to your emails.
In this guide, we’ll cover:
- What DKIM is and how it works
- Why email authentication matters (SPF, DKIM, and DMARC explained)
- How to set up DKIM using the Orbisius DKIM plugin
- Common issues and troubleshooting tips
- Comparing DKIM signing with third-party SMTP services
- How to verify that DKIM is working correctly
By the end of this, you’ll have a solid understanding of how to secure your emails and improve deliverability directly from your hosting server without relying on third-party services.
Why Your WordPress Emails Might Be Landing in Spam
WordPress sends emails for things like user registrations, contact form submissions, order confirmations, and password resets. However, many hosting providers don’t authenticate outgoing emails properly, which means:
- Email providers like Gmail and Outlook can’t verify that the email is truly from you
- Your emails get flagged as spam or outright rejected
- Recipients may see a “via” warning next to your email (for example, yourdomain.com via yourhost.com)
This happens because email authentication records (SPF, DKIM, and DMARC) aren’t set up properly.
Email Authentication Explained: SPF, DKIM, and DMARC
To improve email trustworthiness, mail servers use three authentication protocols.
SPF (Sender Policy Framework)
SPF helps prevent email spoofing by specifying which mail servers are authorized to send emails on behalf of your domain.
- If a server isn’t on your SPF list, the recipient’s mail server may reject or mark the email as spam
- SPF is added as a TXT record in your domain’s DNS settings
Example SPF record:
v=spf1 include:yourhost.com ~all
Do NOT just override your spf record as it can break things. Check with another professional or your hosting company to ensure that you merge your records to ensure all is working because that line also can authorize MX servers, A (<- current hosting) to be legitimate email senders on your behalf. Also if you have email forwarding or use a 3rd party service their records may appear there as well.
DKIM (DomainKeys Identified Mail)
DKIM adds a cryptographic signature to your email, allowing the recipient’s mail server to verify that it was sent from an authorized source and wasn’t altered in transit.
- DKIM uses a public-private key pair
- Your server signs outgoing emails with the private key
- The recipient’s server checks the signature against your public key, which is stored in DNS as a TXT record
Example DKIM record:
default._domainkey.yourdomain.com TXT "v=DKIM1; k=rsa; p=PUBLICKEYGOESHERE;"
If you are sending emails from subdomains, you will need to generate and set up separate DKIM records for those subdomains.
DMARC (Domain-based Message Authentication, Reporting & Conformance)
DMARC tells mail servers how to handle emails that fail SPF or DKIM checks.
- Can be set to monitor only, reject, or quarantine failed emails
- Provides reports on email authentication failures
- Can apply policies to subdomains using the
sptag
Example DMARC record that enforces quarantine for the main domain and all subdomains:
_dmarc.yourdomain.com TXT "v=DMARC1; p=quarantine; sp=quarantine; rua=mailto:reports@yourdomain.com"
Now that we understand these basics, let’s set up DKIM for your WordPress site using the Orbisius DKIM plugin.
How to Set Up DKIM in WordPress Using Orbisius DKIM
Orbisius DKIM is a lightweight WordPress plugin that automatically signs your emails with DKIM, ensuring better deliverability without needing an external email provider.
Get Orbisius DKIM here:
Step 1: Install and Activate the Plugin
- Go to Plugins > Add New in your WordPress dashboard
- Search for Orbisius DKIM
- Click Install Now, then Activate
Step 2: Generate DKIM Keys
- The plugin will automatically generate a DKIM key pair (public and private keys)
Step 3: Add the DKIM DNS Record
- The plugin will provide a TXT record that you need to add to your domain’s DNS settings
- Go to your domain provider’s DNS settings (for example, Namecheap, GoDaddy, Cloudflare)
- Create a TXT record with the provided DKIM key
Step 4: Customize Your Email Settings
- Override the From name and email to match your brand
- Set a Reply-To address
Step 5: Verify and Send Emails
Once the DNS records have propagated, which can take up to 24 hours, your emails will be DKIM signed.
Troubleshooting Tips
DKIM is not detected
- Wait for DNS propagation, which can take up to 24 hours
- Check for typos in the DKIM record
- Use MXToolbox DKIM Lookup to confirm the record is valid
Emails still go to spam
- Ensure SPF and DMARC are also configured correctly
- Check the email content and avoid spammy words or excessive links
- Verify if your domain or IP is blacklisted using tools like MXToolbox or Spamhaus
Comparing Orbisius DKIM vs. Third-Party SMTP Services
Some users rely on external SMTP providers like SendGrid, Mailgun, or Gmail SMTP to improve deliverability. Here’s how Orbisius DKIM compares.
| Feature | Orbisius DKIM | SMTP Providers |
|---|---|---|
| No external service required | Yes | No |
| Improves deliverability | Yes | Yes |
| email sending limits | No limits applied by the plugin (hosting providers may have their own limits) | Yes based on the plan |
| Custom From and Reply-To | Yes | Yes |
If you prefer full control and don’t want to depend on third-party services, Orbisius DKIM is a great solution.
How to Check if DKIM is Working
After setup, you’ll want to verify that DKIM is actually signing your emails. Here’s how.
Even with Correct Setup, Emails Can Still Be Flagged as Spam
Even if you have SPF, DKIM, and DMARC set up correctly, email providers like Google (Gmail) and Microsoft (Outlook, Hotmail, Office 365) use additional filtering algorithms beyond authentication records. These filters analyze factors such as:
• The sender’s reputation and past email behavior
• The email’s content, including words and formatting that resemble spam
• The recipient’s engagement (if users frequently delete or mark your emails as spam)
• Your domain and IP address reputation
This means that while authentication improves your chances of reaching inboxes, it does not guarantee perfect deliverability. If your emails are still getting flagged, you may need to warm up your email domain, improve content quality, or ask users to whitelist your email address.
Use MXToolbox DKIM Lookup
- Go to MXToolbox DKIM Check
- Enter your domain and selector to verify your DKIM record
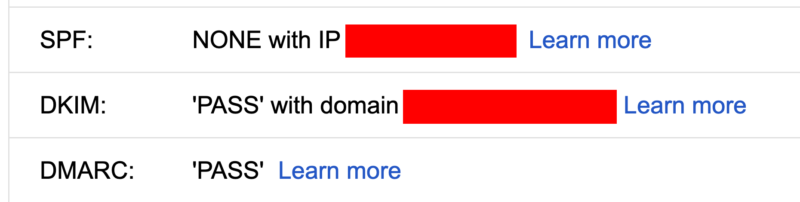
Check Email Headers in Gmail
- Send yourself a test email
- Open the email, click More (three-dot menu) > Show original
- Look for DKIM: PASS in the authentication results
Final Thoughts
Setting up DKIM on your WordPress site boosts email deliverability and builds trust with email providers. Orbisius DKIM makes the process simple by automatically generating DKIM keys, helping you configure DNS records, and ensuring your emails are properly signed.
Try Orbisius DKIM today:
Now that your WordPress emails are authenticated, you should notice fewer emails going to spam and higher engagement rates.