Category: News
MXRoute is a good fit when you manage email for more than one domain. You pay for storage, then you can add multiple domains under the same account. This helps when you launch a new product, buy a second domain, or want two domains to share the same mailboxes.
I had to do this for [KolataTi.bg](https://kolatati.bg). I also own the matching .com domain and wanted both domains to receive email in the same inboxes, without creating duplicate mailboxes.
In the MXRoute control panel, this feature is called **Domain Pointers**. Most people call it a **domain alias**. MXRoute uses “pointer” because the alias domain points to a primary domain and inherits its settings.
Important detail: the menu label is **Domain Pointers** (not Domain Points).
## What a Domain Pointer does
Here is the idea:
- Primary domain: your main domain where mailboxes exist (example: `brand.bg`)
- Alias domain: an extra domain that points to the primary (example: `brand.com`)
When the alias points to the primary, it inherits mailbox names from the primary domain.
So if `info@brand.bg` exists, MXRoute can also accept `info@brand.com`, and deliver both to the same mailbox.
This is useful when you want multiple TLDs to behave like one email setup.
## Before you start
Make sure you know:
- Where DNS is managed for the alias domain (Namecheap, Cloudflare, GoDaddy, and so on)
- Which domain is the primary domain in MXRoute
- That you can add TXT and MX records at your DNS provider
You will do two things:
1. Verify ownership with a TXT record
2. Add mail DNS records so the alias domain can receive mail
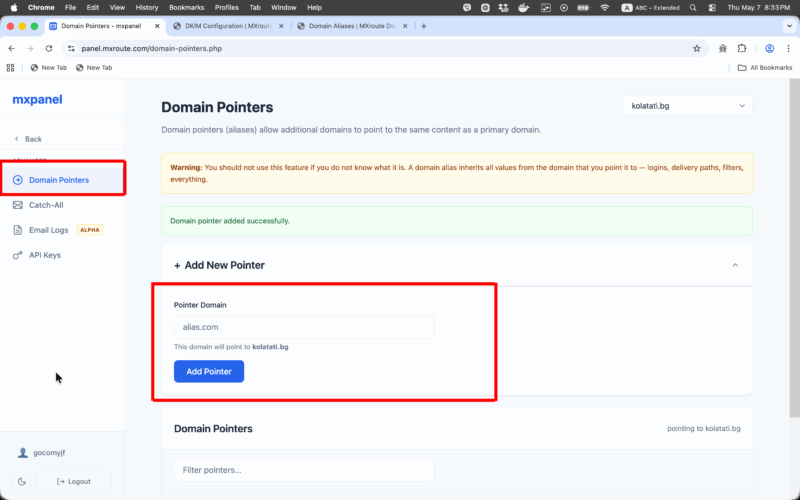
## Step 1: Add the alias domain in MXRoute
1. Log into your MXRoute control panel (mxpanel).
2. Click `Advanced`.
3. Open `Domain Pointers`.
4. Expand `Add New Pointer`.
5. In `Pointer Domain`, enter the alias domain (example: `brand.com`).
6. Confirm the UI says it will point to your primary domain.
7. Click `Add Pointer`.
MXRoute will show a verification TXT record.
Copy the TXT value exactly as shown. Do not change it.
## Step 2: Add the verification TXT record in DNS
Now go to the DNS provider for the alias domain.
1. Open the DNS settings for the domain.
2. Add a new `TXT` record.
3. For `Host` or `Name`:
- If MXRoute shows a specific host value, use it.
- If it does not specify, use `@` for the root domain (common in many DNS panels).
4. Paste the TXT value from MXRoute.
5. Save.
If your provider asks for TTL, keep the default. If you want faster changes, set 300 seconds.
### Optional: confirm the TXT record is live
If verification does not work right away, check if the TXT record is visible publicly:
- <https://dnschecker.org/#TXT/>
Once you can see the TXT record publicly, MXRoute verification usually succeeds soon after.
## Step 3: Verify the alias domain in MXRoute
Go back to `Advanced` > `Domain Pointers` and use `Verify` or `Recheck` for the alias domain.
If it fails, the most common reasons are:
- the TXT record is under the wrong host name
- the TXT value is incomplete
- DNS propagation is not finished yet
## Step 4: Add mail DNS records for the alias domain
Verification proves you own the domain. It does not route mail by itself.
To receive email on the alias domain, you must set mail DNS records on the alias domain.
### 1) MX records (required for receiving)
MX records tell other mail servers where to deliver incoming email for the alias domain.
Add the MX records MXRoute provides for your account and enter them exactly as shown in MXRoute.
If you skip MX records, the alias domain will not receive mail.
### 2) SPF record (important if you send from the alias)
SPF tells receiving servers which systems are allowed to send mail for the domain.
If you plan to send as the alias domain through MXRoute, publish an SPF record for the alias domain too. In most cases it matches your primary domain’s SPF because both send through the same MXRoute infrastructure.
### 3) DKIM record (important if you send from the alias)
DKIM signs outgoing mail.
If you plan to send as the alias domain, publish DKIM for the alias domain too. Otherwise some providers may treat those messages as lower trust, or your mail may fail DMARC alignment.
Publish the DKIM record exactly as MXRoute provides it.
### 4) DMARC record (your policy is strict)
If your domains use:
`v=DMARC1; p=quarantine; sp=quarantine;`
that is a strict policy. It is fine, but it means SPF and DKIM must pass and align for the domain you use in the From address.
Practical rule:
- If you send with `From: user@brand.com`, then SPF or DKIM must pass with alignment for `brand.com`
- If alignment fails, messages are more likely to go to spam because your policy is `p=quarantine`
Publish a DMARC record on both domains:
- `_dmarc.brand.bg`
- `_dmarc.brand.com`
Note: `sp=quarantine` applies to subdomains of the domain that publishes it. It does not apply to a different TLD. Each domain has its own DMARC record.
## What this setup does and does not do
It does:
- let `user@brand.com` receive email in the same mailbox as `user@brand.bg`
- avoid duplicate mailboxes and duplicate users
- keep your brand consistent across multiple TLDs
It does not:
- redirect your website from `.com` to `.bg` (that is web hosting or DNS forwarding)
- automatically change your From address when you reply
- guarantee deliverability if you send from the alias without SPF, DKIM, and DMARC set up for the alias domain
## Common issues and quick fixes
### Verification fails in MXRoute
- Confirm the TXT record was added to the alias domain’s DNS, not the primary.
- Confirm the host value is correct (`@` vs a specific label).
- Wait and try again if DNS is still propagating.
### Receiving works but sending goes to spam
- Publish SPF and DKIM for the domain you send from.
- With `p=quarantine`, failures are punished more aggressively.
### Replies come from the wrong domain
- Your email client may default to the primary identity.
- Create a sending identity for the alias domain if you want to reply from it.
## Simple test after setup
1. Send an email from Gmail to an address on the alias domain.
2. Confirm it arrives in the same mailbox as the matching address on the primary domain.
3. Reply from the address you want to use.
4. In Gmail, open message details and confirm SPF and DKIM pass for the From domain.
Once mail arrives for both domains and authentication passes for the domain you send from, your domain alias (Domain Pointer) setup is done.

Domain Pointers is Domain Aliases